How to set up Shiny Server on a Ubuntu 20.04 server from Digital Ocean
Introduction
This post describes how to set up an instance of (the free and open-source version of) Shiny Server on a Ubuntu 20.04 server, enabling you to host your own R Shiny apps on the internet. The free version of Shiny Server is less full-featured than the paid Professional version, but is still pretty suitable for serving personal projects. My instance is available here, and the source code is here.
It would be ridiculous not to mention Dean Attali's post, which is probably the most comprehensive treatment of this topic (forming the inspiration for this post), so please check that out for more detail.
Droplet creation
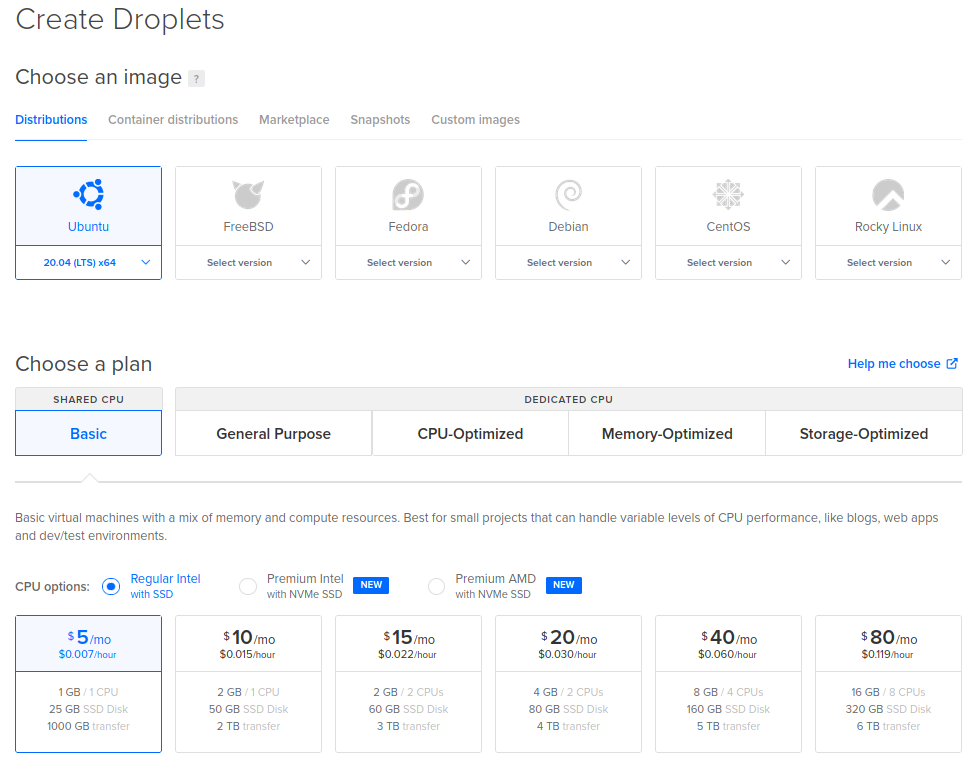
I'm using Digital Ocean, and creating the cheapest ($5 USD/mo) droplet:
For authentication I've set up an SSH key rather than using a root password. I'd recommend you do the same; Digital Ocean has plenty of good resources outlining how to set that up.
Server setup
The first thing to do is to create a non-root sudo user. In the code below, if your name is "Dundee", then replace <username> with dundee; for example, adduser <username> becomes adduser dundee. Click on the droplet name, and then click on the "Console" link in the top-right corner to open a root terminal on the server. Then run the following:
# Add user
adduser <username>
# Give sudo privileges
usermod -aG sudo <username>
# Enable SSH access for non-root user - copy files with ownership and permissions from root to user
rsync --archive --chown=<username>:<username> ~/.ssh /home/<username>
When you add the user, you'll be prompted for a password—which you'll have to supply—as well as some other information (full name, etc.). You can just click Enter on everything after the password, there's no need to supply that data.
The next step is to set up the firewall:
# Allow SSH connections
ufw allow OpenSSH
# Enable firewall
ufw enable
# Check status
ufw status
At this point, exit the console. If your SSH key has been set up correctly, you should be able to open a terminal and SSH in with ssh <username>@<IP address>. Agree to add the ECDSA to the list of known hosts.
Install R, Shiny and Shiny Server
Following the instructions on CRAN, install R with the following:
# update indices
sudo apt update
# install two helper packages we need
sudo apt install --no-install-recommends software-properties-common dirmngr
# add the signing key (by Michael Rutter) for these repos
# To verify key, run gpg --show-keys /etc/apt/trusted.gpg.d/cran_ubuntu_key.asc
# Fingerprint: 298A3A825C0D65DFD57CBB651716619E084DAB9
sudo wget -qO- https://cloud.r-project.org/bin/linux/ubuntu/marutter_pubkey.asc | sudo tee -a /etc/apt/trusted.gpg.d/cran_ubuntu_key.asc
# add the R 4.0 repo from CRAN
sudo add-apt-repository "deb https://cloud.r-project.org/bin/linux/ubuntu $(lsb_release -cs)-cran41/"
sudo apt install --no-install-recommends r-base-dev
# verify that it's installed okay
R -e 'R.version'
Now we install the Shiny R package, and Shiny Server itself. On Ubuntu Server 20.04, I actually got a weird error when installing the Shiny package that seemed to imply that there wasn't a C/C++ compiler installed. It turns out that we might have to install these first. (We also may need to install r-base-dev rather than r-base, which I've done above.) Anyway:
# Install some compilers
sudo apt install make gcc g++ cmake gfortran
# Install the Shiny R package
sudo su - -c "R -e \"install.packages('shiny', repos='http://cran.rstudio.com/')\""
# Install GDebi (used to install local Debian packages)
sudo apt install gdebi-core
# Download Shiny Server
wget https://download3.rstudio.org/ubuntu-14.04/x86_64/shiny-server-1.5.17.973-amd64.deb
# Install Shiny Server
sudo gdebi shiny-server-1.5.17.973-amd64.deb
Nginx
We will use Nginx as the reverse proxy. The following code installs it, and adds firewall exceptions for HTTP and HTTPS traffic, and on port 3838 (which is what the Shiny Server listens on):
# Install nginx
sudo apt install nginx
# Adjust firewall (enable 80 and 443)
sudo ufw allow 'Nginx Full'
# Allow traffic through to Shiny Server
sudo ufw allow 3838
Open the Nginx configuration file sudo nano /etc/nginx/nginx.conf, and add the following (inside the existing http block):
http {
    ...
    # Map proxy settings for RStudio
    map $http_upgrade $connection_upgrade {
        default upgrade;
        '' close;
    }
}
Save and exit, and then open the default Nginx server block sudo nano /etc/nginx/sites-enabled/default. Above the server block, add the following:
map $http_upgrade $connection_upgrade {
  default upgrade;
  ''      close;
}
Then, inside the server block, add the following configuration that tells Nginx to proxy pass to the Shiny Server (on localhost:3838), i.e., route requests at '/' (root) to the Shiny Server. Add this directly below server_name _;. If there is already a location / {...} block, then remove it.
location / {
  proxy_pass http://127.0.0.1:3838/;
  proxy_http_version 1.1;
  proxy_set_header Upgrade $http_upgrade;
  proxy_set_header Connection $connection_upgrade;
  rewrite ^(/shiny/[^/]+)$ $1/ permanent;
}
Save the file. At this point, we can test that the configuration syntax is okay by running sudo nginx -t. Let's also restart the Nginx service to pick up the new configuration with sudo systemctl restart nginx.
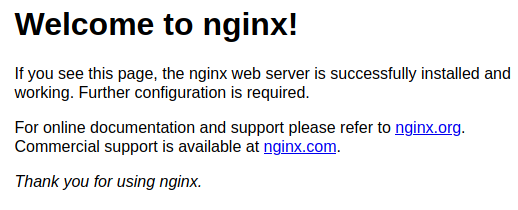
If you now navigate to the server's IP address, you should see the following Nginx welcome message:
The real test, though, is whether we can get through to Shiny Server. Since it listens on port 3838, navigate to that particular port. For example, if your IP address is 111.111.11.11, then navigate to 111.111.11.11:3838 in the browser. Hopefully, you see the following default Shiny Server home page:
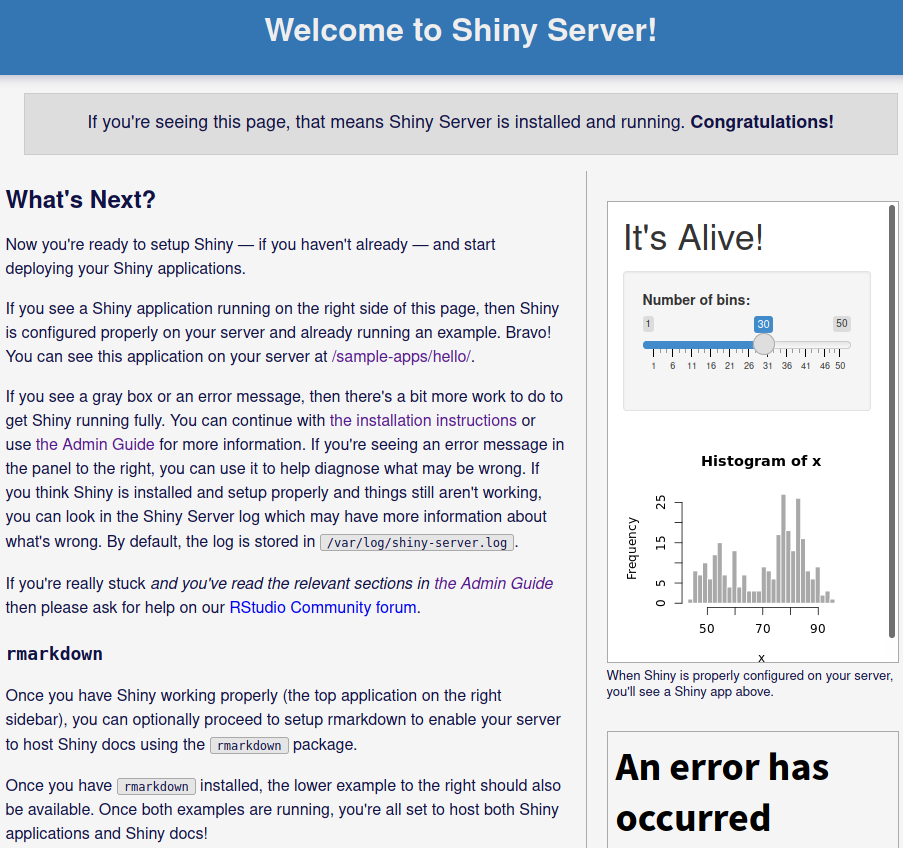
Awesome! (Don't worry about the error in the bottom-right corner; we haven't installed R markdown yet, so that's expected.) If this doesn't work, check that the Shiny Server service is working with sudo systemctl status shiny-server.
Deploying apps
If you're developing apps locally, you could just SFTP the files across; but (hopefully) you're using some sort of version control. There are several ways to set this up, but probably the simplest is to have a single Git repo for all the apps on your Shiny Server. Apps are served from /srv/shiny-server, so cd into that directory and either clone an existing (or initialise a new) Git repo. By default, Shiny Server will look in /srv/shiny-server/appName folders for app.R or server.R files, and if it finds them, it'll treat that path as a Shiny app directory. For example, there's an example app at /srv/shiny-server/sample-apps/hello, which you can find at <IP_ADDRESS>:3838/sample-apps/hello/. If you'd like to see an example repo, my Shiny Server repo is here.
Installing packages
It's easiest to install packages as root so that they install into a shared library, rather than installing packages as the named user, because the Shiny apps will be run under the shiny user, which will not have access to R packages installed into your user library. That's why we install packages using the sudo su - -c "R -e \"install.packages('package-name', repos='http://cran.rstudio.com/')\"" template.
Additionally, you may come into some issues with the small size of the server droplet. For example, installing the raster package throws an error because there isn't enough available RAM. There may also be some system dependencies that aren't installed; for example, the rgdal package requires the GDAL and PROJ libraries, which you need to explicitly install first. The R package leaflet depends on raster, so you can quickly get confused as to what exactly is throwing the error.
So, to install leaflet, you first need to turn off your droplet, and resize it to 2 GB RAM. Once it's turned back on and you've SSH'd back into the server, install libgdal-dev:
sudo apt install libgdal-devHopefully now we can install the GIS packages (leaflet will install raster as a dependency anyway):
sudo su - -c "R -e \"install.packages('leaflet', repos='http://cran.rstudio.com/')\""
sudo su - -c "R -e \"install.packages('rgdal', repos='http://cran.rstudio.com/')\""
After that, you can turn off the droplet and resize it back to 1 GB RAM.
References
The Shiny Server Administrator's Guide will be pretty useful after this.