Flickering-flame LED effect using MicroPython on a Raspberry Pi Pico
I was recently watching a Wyloch's Armory video about making volcanic terrain for tabletop RPGs. At one point he uses an electronic tealight candle with a flicker effect (used in place of a regular tealight candle to simulate a dancing flame) to light up a smoke cloud with volcanic eruption effects, and it looked incredible.
I thought it'd be fun to replicate this effect without just buying a ready-made candle. It seemed well above my abilities to replicate it solely with an electrical circuit (and I feel obliged at this point to issue a PSA to remind the internet that "flicker" and "blink" are not synonms). I ended up stumbling upon a video by FriendlyWire, who uses a PIC microcontroller and pulse-width modulation to achieve pretty much exactly what I was looking for: a simple circuit with an LED that flickers like a real flame.
Taking inspiration from those two videos, this post describes how I used a Raspberry Pi Pico microcontroller, a simple MicroPython script, and a tiny electrical circuit to replicate the flickering effect of a flame. Here's what it looks like on the table, sitting inside the hollowed-out model volcano column:

The MicroPython script is available on my GitLab.
Prerequisites
- A Raspberry Pi Pico (any type should work fine, though depending on whether you're planning to solder the circuit together you may want the header or headerless version), set up with the MicroPython firmware. I'm not going to describe how the Pico works, and how MicroPython speaks to it, because the official documentation does a much better job than I ever could. So, if this is your first time using the Pico with MicroPython, follow along with the excellent Getting started guide.
- A breadboard and some jumper wires.
- An orange (or red, or yellow, or whatever) LED, standard 2 V forward voltage and 20 mA current.
- A resistor, somewhere around 165 Ohms. The GPIO pins supply 3.3 V, and if V = IR, then 3.3 V = 0.02 A x R, so R = 3.3 V / 0.02 A = 165 Ohms. The closest I had was a 110-Ohm resistor, and that worked fine.
- Optional: Two or three 1.5 V AA or AAA batteries, and a corresponding battery box.
Electrical circuit
If you've followed along with the official guide, you should be able to control an external LED using a circuit like this (credit: Raspberry Pi):
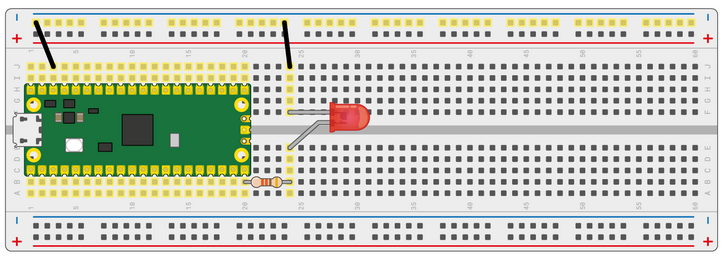
We don't need to modify this circuit in any way, we just need to modify the script!
MicroPython script
Here's the entirety of the MicroPython script:
from machine import Pin, PWM
from random import randint
from time import sleep

max_brightness = 65535
min_brightness = int(round(max_brightness / 2, 0))
max_sleep_time = 1000
min_sleep_time = 1

pwm = PWM(Pin(15), freq=1000)

while True:
    pwm.duty_u16(randint(min_brightness, max_brightness))
    sleep(randint(min_sleep_time, max_sleep_time) / 10000)
This is using pulse-width modulation (PWM) to control the voltage sent to the LED in a pseudo-random way. There are two elements of randomness here: the brightness of the LED itself, and the time that the LED spends at a given brightness. There are infinite ways to replicate the flickering of a flame, and you can probably come up with something better than this pretty easily, but it works well for my purposes and I love its simplicity, so I stuck with it. Let's look at exactly what is happening here.
After importing our dependencies, we define some constants:
-
max_brightness: We will be controlling the brightness of the LED by sending a 16-bit value. The maximum value this can take on is 65535. -
min_brightness: I don't want the LED to become too dim, so we set this to half of the maximum brightness. -
max_sleep_time: As described above, we'll be randomising not only the brightness of the LED, but also the time at which the LED stays on a certain brightness. I've set these to be integers to be compatible withrandom.randint, but ultimately we'll be dividing by 10,000th of a second, which means that a value of 1000 is actually 10 milliseconds. -
min_sleep_time: A setting of 1 corresponds to 10 microseconds.
We then instantiate the PWM object with
pwm = PWM(Pin(15), freq=1000). We're using GPIO pin 15 to control
the LED (which is the same pin used by the
Getting started guide),
and we set the frequency to 1000 Hz. Frequency in the context of PWM is
how often to switch the power on and off; probably anything faster than the
human eye can see is okay, but 1000 seems to be a common value.
It's probably time for a little digression into pulse-width modulation. We control the perceived brightness of the LED by changing the duty cycle, which is the proportion of time that the LED is on. The higher the proportion of time that the LED is on, the brighter it appears, and vice versa. This is how the brightness of lights is typically controlled: When you turn the dial on a dimmer switch, you aren't changing the voltage or current sent to the LED, you're just changing the proportion of time that power is supplied to the LED. As long as the frequency of power switches is much faster than we can perceive, we just interpret a lower proportion of "on" time as a dimmer light. If voltage is supplied to the LED 90% of the time, it's bright; if voltage is supplied only 20% of the time, it's dim.
When we call pwm.duty_u16(randint(min_brightness, max_brightness)),
we're randomising the duty cycle of the LED, and therefore randomising the
perceived brightness.
sleep(randint(min_sleep_time, max_sleep_time) / 10000) then pauses
the script for a random time between 10 microseconds and 10 milliseconds. This
gives a bit more noise to the brightness changes, which I think makes it look a
bit more realistic as a flickering flame.
Finally, we run the whole thing in while loop, repeating
indefinitely. And that's basically it: Transfer the code to your Pico, and the
LED should flicker like a flame.
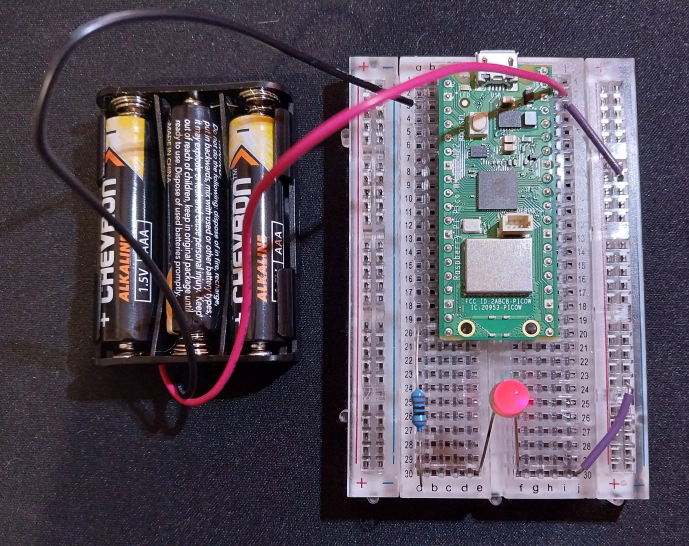
Battery power
I built this circuit to fit inside a model volcano, so it needed to be battery-powered. Fortunately, it's really simple to run a Pico off batteries.
The Pico can run off anywhere between 1.8 and 5.5 V. Since the GPIO pins deliver 3.3 V, I thought using two or three 1.5 V batteries inside a battery box would be sufficient.
Connect the negative terminal to a ground pin (you have several options as shown
in the
pin-out diagram;
I chose pin 3). Connect the positive terminal to pin 39, the VSYS pin. As long
as you've named your MicroPython script main.py, the Pico will run
it on startup, so it should start flickering immediately. Here's the final circuit: